This guide format assumes that you understand the concepts behind NSX or just want to quickly get it up and running in a lab environment so you can learn more about how NSX works. If you want more detailed information about each step in this guide, look for another post with more details in the coming weeks.
To install NSX, you’ll first need to download the NSX Manager bits from VMware. You’ll want to grab “NSX for vSphere”. For the sake of this post we are using NSX for vSphere 6.3.5.
Prerequisites
- NSX Manager OVA file
- vSphere Version
- vSphere 5.5U3 or later
- vSphere 6.0U3 or later
- vSphere 6.5U3 or later
- vCenter Server 6.0 or later
- VLAN on physcial switches for VXLAN traffic with MTU greater than 1600
- Distributed Switches rather than Standard Switches
- NSX Install Requirement Details can be found here
NSX Manager Appliance Deployment
- Right click your cluster and select “Deploy OVF Template”.
- Select your NSX Manager OVA file and hit next.

- Name your NSX Manager Appliance and select where to place it in your environment. I name all of my VMware appliances with a “VMware -” prefix so they are easy to find in vCenter.
- Select the resource pool where you would like to place the VM

- Click next to accept the advanced configuration options

- Accept the license agreement

- Select your storage location for the VM. I use VSAN in my lab, so I placed it on my vsanDatastore. You can also choose between thick or thin provision. For a lab, I would thin provision. For production, you should thick provision.

- Select the network (port group) for the NSX manager IP to be placed on. This network will need to be able to talk to all of the host management interfaces as well as vCenter Server.

- Customize this template as needed. The settings are pretty self explanatory and I won’t dive into the details of each item in this post. My default gateway(DG) doesn’t exist yet, but it doesn’t need to exist during the initial deployment. That DG will eventually be an interface on an edge services gateway (ESG) and will be my internal interface on the virtual firewall for all internet bound traffic.

- Select a complex password for admin and privileged mode

- Select next and Finish to begin deployment. Once deployment completes and you can ping it, continue to the next section to configure the NSX Manager.
Initial Configuration
Once the deployment has completed, you can login to the NSX manager’s admin page to configure the basic options.
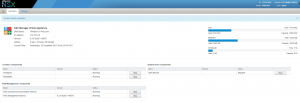
- Open a web browser and connect to the IP address of the NSX Manager. No special port needed. It’s a secure site, but the http version will redirect you. The initial page of the NSX manager will look like below.

- Click Manage Appliance Settings and fill in the details for NTP and Syslog server (if you use one)

- Select Network on the left side and fill in any missing details. Add an additional DNS server if you have one, and fill out the domain info as well.

- If you have an internal FTP site, you can use it for backing up the NSX Configs. If this applies, select Backup & Restore and configure the details.

- Connect the NSX Manager to your vCenter Server. Do this by selecting NSX Management Service on the left side. Edit the Lookup Service URL and the vCenter server details. Fill in the info for your server. You may get pop ups about SSL certs and you’ll want to hit yes to use them. It should look similar to the picture below once the connection is complete.

- Go back to the summary page, and it should look like this:

- NSX Manager is now connect to vCenter and we can now manage it from the vSphere web client (with flash).
NSX Manager Configuration in vCenter
Now that the NSX Manager can talk with vCenter, we need to login to vCenter as the SSO Administrator. If you are already logged in, log off and log back in so we have the new options for NSX Manager.
- Log into vCenter via the Web Client as the SSO admin (usually administartor@vsphere.local. If you don’t do this, you’ll get this error.

- On your home page you should see a new icon for Networking & Security. Click that icon to jump to the NSX management page.

- On the NSX manager page, you should see the following view. The items on the left are the high level menu options you will use for configuration and management of your NSX environment.

- Start by adding your normal vCenter user account as an admin in NSX. Do this by clicking on “NSX Managers” at the bottom of the left column and then click on the the link to your NSX Manager settings.

- You will now be at the following page where you can go to Manage and then Users to add your account.

- Click the + sign to add a user. Specify the user settings by using a User or Group from vCenter. I prefer groups since it’s best practice to do it that way.

- Select the role for the user. I use the Enterprise Administrator role for full NSX Administrator rights.

- We now need to add some Exclusions to the NSX firewall. Click the Exclusions tab and add your server. vCenter is automatically added to this list during the install. For a lab, I would put whatever management or admin server you are working from, into this list. This will prevent you from accidentally making a change that cuts off your access to vCenter or the NSX Manager.

- At this point, you can log out of the web client and log back in with your normal account. We are ready to prep our cluster for using NSX.
Cluster Preparation
- Log back into the vSphere web client and then go to Network & Security. This time we will need to be on the Installation page. Click that on the left side. You’ll be presented with the page where we can add NSX controllers. You’ll need to deploy 3 controllers. Do this by clicking the + sign under NSX Controller Nodes

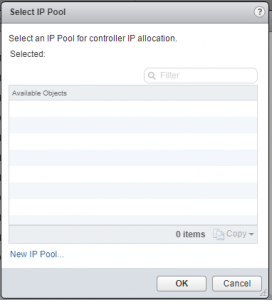
- Fill in the details for each controller. The “Connected To” option is to specify with switch (port group) that the controller’s management IP will be on. You have to wait for the deployment of each one to complete before doing the next one. Sometimes you have to refresh the page to see them complete their deployment. The next few steps are in regards to creating the IP Pool needed to deploy the controller.

- If you currently don’t have any IP Pools, you will need to create one. If you mess up and need to redo this, the IP Pools are in the NSX manager page (same page we added the user and exclusions).

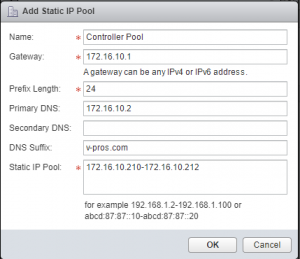
- Name your IP Pool and give it a default gateway. This can be the gateway that we are going to eventually create on the ESG. You can use the picture below an an example of how to configure this. I created a pool with only 3 addresses since it’s just for the controllers.

- Once created, you can now select this pool and hit ok.

- Finish the deployment of each controller until you see 3 of them, and that each have two green dots in the Peers column.

- Next we will prepare the hosts using the Host Preparation tab. Click on your cluster and then click Actions and Install. The hosts will receive the agents needed for NSX to function.

- Once complete it should look like the picture below. On this same page, we will configure the VXLAN portion of NSX. Under the VXLAN column, select “Not Configured”

- Configure the VXLAN settings like below. The switch you select will need to be able to talk to the VXLAN VLAN that you created on your physical switch. Be sure the MTU you set here, matches the MTU on your VLAN and the switch itself. You will need to create another IP Pool for the VXLAN vmkernal nics. The next step will detail that.

- Name your new IP Pool and configure the required settings.

- Once configure successfully, it will look like the picture below.

- Next we will configure the Logical Network using the Logical Network Preparation tab. Select that tab and then click the Segment ID button.


- Specify a segment ID range. This is like VLANS for NSX.

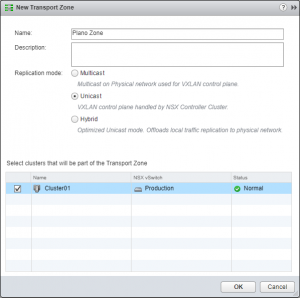
- The final step is creating a Transport Zone. With only one cluster and a single site, you don’t need to put much thought into this.

- Name the Zone and hit ok.

- NSX is now configure and you can begin to deploy firewall rules, Edge Service Gateways and Distributed Logical Routers. These steps will be in a new post.
Related posts
About the Author

Kenny Ahnemann has over 20 years of experience with VMware in corporate production environments in the IT industry. He has consulted on projects for global corporations, healthcare facilities, Las Vegas casinos, nuclear power plants, as well as NASA. He has a passion for what he does and believes in helping others on their journey through the always changing IT landscape.


Social Media